Tutorial: From registration to the first bulk SMS

The first steps in using the seven.io SMS gateway

You have decided to send your first SMS through our SMS gateway? Welcome, we’re happy to have you! Before you can start sending SMS, you have to register and set up your account. Occasionally, questions arise during this setup process. Therefore, we would like to provide you with this article to help you; follow these first steps to send your first SMS.

If you still have questions, feel free to contact our support or visit our helpdesk.
1. Registration

To create your account, register in our webapp. We need your full name and email address for this. We also recommend that you set up two-factor authentication for added security after you register.

By registering, you will get your own account. Please note that you do not pay a basic fee, nor is there a minimum contract term for just using our SMS feature. You only pay for what you actually use. If you use your own inbound number, regular charges will apply. After registration, your account will receive a test credit of 0.50 €.

2. Setting up your account

Once you have registered, the next thing you should do is set up your account. This includes completing your data, but also setting up the features you want to use. While this is the most time-consuming of the first steps, you will only need to interact with most of these settings once.

2.1 Specify billing address

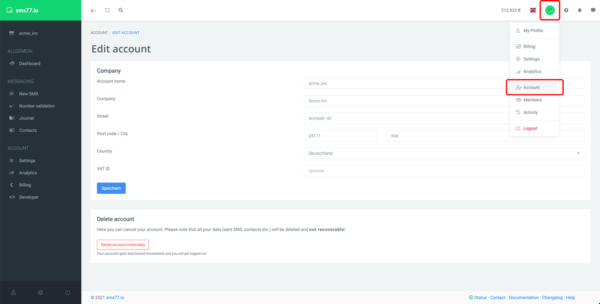
First of all, it is necessary that you specify your company’s address. The deposited address will be used on your billing statement, which will be sent to your email address.

If you wish, you can also provide an additional email address to which the email with your invoice will also be sent. Our customers like to use this feature to send the invoice directly to their accounting department.

One of the first steps you need to take: Adding your company's address

Enter your company address here, click to enlarge

2.2 Invite members

If you want several people to have access to your account, you can add account members. Your members do not need to have created their own accounts beforehand, you simply invite them via their respective email addresses. Members can be assigned different roles, each with different access permissions. Possible roles are: Administrator, Developer, Finance and Messaging.

2.3 Optional in some circumstances: Create API key(s)

If you want to integrate our SMS dispatch into a third party or your own software or use it via our HTTP API, you first need to create an API key in the webapp under the Developer menu item. You can also create multiple API keys in the same place, even for use in a sandbox environment. We recommend that you use an API key with at least 64 characters, if your system allows this many characters.

If you need information on how to use our HTTP API, please refer to the corresponding documentation for more details. For information on integrating with different software, see our integration page and GitHub. Are you looking for SDKs? You’ll find them on our developer page.

2.4 Optional in some circumstances: Create or import contacts

If you want to send SMS directly from our webapp, you need to create your contacts in advance. You can also import contact lists and customize the fields of a contact as you like. You can find an example in our Youtube video, which is in German, but you can activate English subtitles: Import contacts and use custom fields. You’ll also find it useful to create groups for sending bulk SMS.

If you are sending SMS from another application, it may be possible that you do not need to create your contacts separately. However, this is usually only the case in those applications for which we have developed a plugin so that contact data can be sent directly from the application.

2.5 Optional: Set a default sender name (Sender ID)

If you’d like to, you can set up an individual sender name that will be displayed on the receiving phones when you send an SMS. You can specify up to eleven alphanumeric characters or up to 16 digits here. If you compose your SMS in the webapp, you can change your sender name in the same window in the Sender ID field. However, you can also set a default sender name that will always be used if you do not specify one separately. If you use our service from another software, you can usually specify a sender name there as well.

3. Top up account and set up payments

Before you send your first bulk SMS, you usually need enough credit. This is why you need to top up your credit. Set up an automatic top-up right away if you would like to. You can also set up an automatic top-up for any subaccounts you may be using. Please note that it may take up to 24 hours for your credit to be released when you top up your account for the first time.

Good to know

The minimum amount for a top up is 1€.

4. Sending the first (bulk) SMS

Before you send bulk SMS for the first time, you should validate all numbers of your contacts once. This way you make sure that there are no invalid numbers in your contacts, which would only unnecessarily increase the costs for your SMS dispatch.

In the following paragraph we show you how to send SMS via our webapp. For SMS sending via HTTP API please have a look at our documentation.

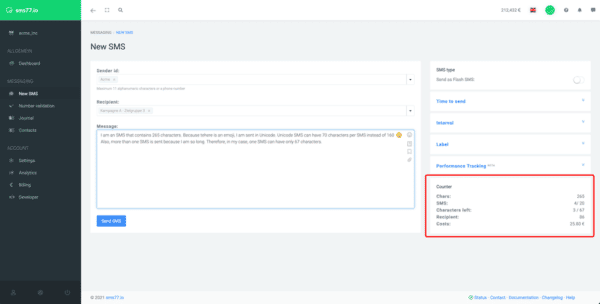
Under the left menu item New SMS you can now compose your first SMS. In the lower right field next to the text field you can always see how long your SMS is and what costs you can expect.

Your default sender name will be displayed automatically. In the Recipient field you can select the group you want to send your bulk SMS to. The use of placeholders allows you to customize your SMS to the people you are addressing. Of course, you can also send messages to individual recipients.

Follow these first steps to send your first SMS

Have an eye on how much you pay for sending SMS, click to enlarge

5. Conclusion

These are the first steps you need to take before using our gateway – from registering to sending your first SMS. Of course, there are other features available to you that we have not shown here, such as sending voice messages, using subaccounts, or setting up your own inbound number. If you have questions about a specific topic, you can use our helpdesk, where we have already answered many frequently asked questions. Your question is not listed? Our support team will be happy to help you.
In addition, you can find numerous plugins on GitHub that we have developed for popular third-party software.

We hope that these first steps help you and we are grateful for questions, criticism and feedback. Just leave us a comment!

Best wishes
Your sms77 team

Header: iStock.com/John Kevin, edited color.

1 Comment. Leave new

Leave a Reply

Your email address will not be published. Required fields are marked *

Fill out this field
Fill out this field
Please enter a valid email address.

This site uses Akismet to reduce spam. Learn how your comment data is processed.